Get CSF Key Inside SOA Composite on BPEL

We know that Oracle WSM (Web Services Manager) agents handles the Credential Store very well and is the best approach to calling secure services through client policies. For example, if we need to call a service that is secured by WS-Security Username Token, we can simply attach the “oracle/wss_username_token_client_policy” to the service reference, and then use the “csf-key” binding property to make a reference to some credential, and the OWSM agents will do the will do all the work.

However, many times we face the scenario where the service being called do not follow the standards or use some kind of home-made authentication, even inside the SOAP Body. Furthermore, there are many use cases where it can be useful to get access to a CSF Credential Key inside the BPEL flow, programmatically, to get username and password in hands to assign it to variables and do whatever you need.

It’s possible to do this trick using the “Credential Store Framework API” (CSF API), though a “Java Embedding” activity. There a few steps needed to accomplish this, which are described below:

1 – Prepare your IDE, adding the library “BC4J Security” in the project’s classpath on JDeveloper:
17_image1

17_image3

17_image2

2 – Create a “Java Embedding” activity to retrieve the username and password from the credential store:


try {  
  oracle.security.jps.JpsContextFactory jpsCtxFactory = oracle.security.jps.JpsContextFactory.getContextFactory();  
  oracle.security.jps.JpsContext jpsCtx = jpsCtxFactory.getContext();  
  oracle.security.jps.service.credstore.CredentialStore credStore = jpsCtx.getServiceInstance(oracle.security.jps.service.credstore.CredentialStore.class);  
  oracle.security.jps.service.credstore.PasswordCredential cred = (oracle.security.jps.service.credstore.PasswordCredential)credStore.getCredential("test-cred-map", "test-cred-key");  
  if (cred == null) {  
    System.out.println("Credential not found.");  
  } else {  
    String username = cred.getName();  
    String password = String.valueOf(cred.getPassword());  
    System.out.println("Credential username: " + username);  
    System.out.println("Credential password: " + password);  
  }  
} catch (Exception e) {  
  e.printStackTrace();  
  addAuditTrailEntry(e);  
}

If you want a cleaner code, declare the imports in the beginning of the BPEL file (just before “partnerLinks” tag) and use the simple class names – be careful about the differences in the import statement between BPEL 1.0 and 2.0: http://docs.oracle.com/cd/E23943_01/dev.1111/e10224/bp_java.htm#SOASE87123

3 – Prepare the SOA environment to accept your deployment, adding the “jps-manifest.jar” file in the BPEL compilation classpath “BpelcClasspath”:
17_image4

17_image5

17_image6

17_image7

Use the full qualified path here. The common path for this library is: $DOMAIN_HOME/oracle_common/modules/oracle.jps_11.1.1/jps-manifest.jar

4 – Create your credential for testing the code:

17_image8

17_image9

17_image10

17_image11

5 – Grant permission for your custom code to access your credential map and keys:

5.1 – Edit “system-jazn” file: $DOMAIN_HOME/config/fmwconfig/system-jazn-data.xml

5.2 – Add a grant permission, appending the following tag to the end of “jazn-data/system-policy/jazn-policy”:

<grant>
  <permissions>
    <permission>
      <class>oracle.security.jps.service.credstore.CredentialAccessPermission</class>
      <name>context=SYSTEM,mapName=test-cred-map,keyName=*</name>
      <actions>read</actions>
    </permission>
  </permissions>
</grant>

P.S.: omitting the “grantee” tag, any deployed code will get access to the credential map.

17_image12

6 – Restart both Admin and Managed Servers so “system-jazn” update can take effect;

7 – Test your code and see the magic:

17_image13

The approach shown in this article can be adapted to be used in other FMW technologies, like inside Service Bus (through a “Java Callout”) or some JavaEE application deployed on the WebLogic server.

Docker Images for WebLogic Server 11g

The Oracle’s official GitHub repository contains only images for WebLogic Server 12c, which is the only certificated WLS version to run inside Docker, as you can see in this Oracle’s Blog article. However, many companies still have the WebLogic 11g version in their environments, which is my case. Therefore, I just created two simple images for WebLogic Server 11g (v10.3.6) in my personal public DockerHub repository at https://hub.docker.com/u/gibaholms/.

Despite the WLS 11g version is not officially certified by Oracle to run on Docker, I did not notice any problems on my images, so they demonstrated to be very functional for development purposes. The idea is to use these images to development environment provisioning in my company.

It is certain that the official Oracle’s 12c images are much more complete and have more features, including the possibility to start a node manager and managed servers in linked containers. The WLS 11g images that I have created are a little simpler for now, but address very well my actual needs. However, as I have available time, I will evolve these images to provide more features.

I also recommend to do not use these 11g images in production, because of the fact that they are not certified by Oracle.

Docker Image for Oracle WebLogic Server 10.3.6 Generic

This image contains the basic installation of Oracle WebLogic Server 10.3.6 over Oracle Linux 7 x64 and Oracle JDK 7u79 x64.

Edit 01/23/2016:
Unfortunately the “Oracle Trademark & Copyright Legal Group” forced DockerHub to delete my WebLogic repositories, because as they said, it “violate their licensing or trademark rights”. However, you can rely on the Dockerfiles that still available in the GitHub link. I apologize for that.

All the information needed about how to run the image is in the image’s DockerHub Repository at https://registry.hub.docker.com/u/gibaholms/weblogic/.

All the information needed about how to build the image and the Dockerfile reference are in the image’s GitHub Repository at https://github.com/gibaholms/docker/tree/master/weblogic/10.3.6.

Docker Image for Base Domain for Oracle WebLogic Server 10.3.6

This image extends the previous image creating a base WLS domain containing a single AdminServer responding on port 7001.

All the information needed about how to run the image is in the image’s DockerHub Repository at https://registry.hub.docker.com/u/gibaholms/weblogic-base-domain/.

All the information needed about how to build the image and the Dockerfile reference are in the image’s GitHub Repository at https://github.com/gibaholms/docker/tree/master/weblogic-base-domain/10.3.6.

Enjoy!

SiteMinder and WebLogic Single SignOn Experience

In a previous post I presented some SiteMinder “mock” agents which I created to ease the development of SSO applications with CA® SiteMinder. Now I will dedicate this post to talk more about the general experience of using SSO with SiteMinder and WebLogic, and some tips and tricks to accomplish this task rounding some common problems.

As I described in the post “SiteMinder WebLogic Security Provider Mock”, the authentication flow we achieve is:

  1. User requests for a protected page;
  2. SiteMinder agents redirects to an single unified login page, propagating the context of the original request;
  3. User enter his credentials on the unified login page;
  4. The unified login page authenticates the user against SiteMinder directories and redirects to the original page;
  5. User sees the protected page (with his valid “UserPrincipal” in the security context).

Particularly I didn’t find much reference on the internet about projects like this, what made the solution design a little hard, but the hands on allowed us to realize some interesting things about the case and I will dedicate this post to tell a little about these.

Should We Use Only ASA, Only WAS, Or Both ?

This is one of the main questions our time made during the solution design. In order to contextualize, the Application Server Agent (ASA) is a SiteMinder component responsible for integrating the Application Server with the SiteMinder Server. CA provides specific ASA distributions for each of the major application servers in the market, in our case, Oracle WebLogic Server 11g. The ASA is usually a package of some java libraries and some JAAS components to deploy to the application server. The Web Server Agent (WSA) is another SiteMinder component responsible for integrating the Web Server with the SiteMinder Server. There are also specific WSA distributions for the main web servers, most commonly Apache, or in our case, Oracle HTTP Server 11g, which is much similar to Apache.

Well, if you deploy only the ASA and make some tests, it will look like you site is protected. By the other hand, if you deploy only the WSA it will look like your site is protected also. But when you go deep in the tests, you will notice that you need the both of them.

The table below summarizes the behavior of an application when only protected by ASA, and the last column shows the final behavior when we add the WSA:

  Web Application Context SiteMinder Application Server Agent Behavior SiteMinder Web Server Agent Behavior
Accessed Resource JSESSION_ID SMSESSION Expected Behavior JAAS Security Principal Web Agent Behavior
1 Public None or Not Authenticated None Grant acess No None
2 Public None or Not Authenticated Valid Grant acess Yes Recycle SMSESSION and add SM HTTP Headers (like SM_USER and SM_SERVERSESSIONID)
3 Public None or Not Authenticated Invalid or Expired Grant acess No Set SMSESSION = LOGGEDOFF
4 Public Authenticated None Grant acess Yes None
5 Public Authenticated Valid Grant acess Yes Recycle SMSESSION and add SM HTTP Headers (like SM_USER and SM_SERVERSESSIONID)
6 Public Authenticated Invalid or Expired Grant acess Yes Set SMSESSION = LOGGEDOFF
7 Protected None or Not Authenticated None Redirect to login page (by ASA) No Redirect to login page (by WSA). Obs.: using the SMWebAgentFilterMock, the first redirect will still be made by ASA and only the subsequent by the filter (due to JEE architecture restriction), but the result is the same.
8 Protected None or Not Authenticated Valid Grant acess Yes Recycle SMSESSION and add SM HTTP Headers (like SM_USER and SM_SERVERSESSIONID)
9 Protected None or Not Authenticated Invalid or Expired Deny access with HTTP 403 error No Set SMSESSION = LOGGEDOFF and redirect to login page (by WSA)
10 Protected Authenticated None Grant acess Yes Redirect to login page (by WSA)
11 Protected Authenticated Valid Grant acess Yes Recycle SMSESSION and add SM HTTP Headers (like SM_USER and SM_SERVERSESSIONID)
12 Protected Authenticated Invalid or Expired Grant acess Yes Set SMSESSION = LOGGEDOFF and redirect to login page (by WSA)

The main problems of the only ASA approach are the lines 9, 10 and 11 highlighted above:

  • Line 9 – protected resource with an empty java session and invalid SiteMinder token

Due to Java Authentication and Authorization Services (JAAS) architecture limitations, the Servlet Authentication Filter (SAF) component inside the WebLogics ASA Security Providers intercepts the request only when you don’t have an authenticated session neither a security token. The SAF component is an extension to JAAS which acts before the authentication providers and permits that a request to be redirected. When you already have the security token, regardless it is invalid or not, the SAF component will not run. In this case, only the Identity Asserter Provider (IAP) runs, and IAPs are not capable to do any redirects, then considering this limitation, a HTTP 403 error is the best an IA can do in this case.

  • Line 10 – protected resource with an authenticated java session and no SiteMinder token

When you already have an authenticated user into a valid Java HTTP Session, the security providers don’t act anymore, regardless of the SiteMinder token. That is, the JSESSIONID is “commanding” the authentication. This can be a really bad side effect when you talk about SSO between multiple applications which don’t share the same JSESSIONID, because some user can authenticate in other application with other credential and acquire a SiteMinder SMSESSION, and when he comes back to the original application, the credential on the JSESSIONID will override the SMSESSION, breaking the SSO (in fact a bad security risk).

  • Line 12 – protected resource with an authenticated java session and invalid SiteMinder token

Because the same reasons of the line 10 (JSESSIONID “on charge”), the ASA providers are not called to do any checks on the SiteMinder token if the user already has an authenticated java session.

The three points above make clear that only ASA is not sufficient to do the SSO with SiteMinder. Looking to the column on the right, we see that adding WSA causes the expected SSO behavior. As WSA stays in a layer before the application server, WSA can always check the SiteMinder token and work on it before it reaches the WebLogic, making now the SMSESSION “on charge”. This way, the only work ASA does is building the Security Principal from the SMSESSION token.

Now you could be questioning… Why not then use only WSA?

  • Different from an application which runs in one single web layer (like PHP), we have here two distinct layers which is the Web Server and the Application Server. So if we protect only the Web Server layer, it causes an internal security problem, because anyone who makes direct access to the application servers host and port will gain full access to the application;
  • Supposing that you are not concerned about internal fraud and block your application server direct access through firewall, then you would need to make some logic to get the “SM_USER” request header injected by WSA to protect your application. It is a bad JEE practice because you would be doing some sort of homemade security treatment, instead of using the JEE security standards, and something like a NullPointerException not discovered in the tests could compromise the whole application security, besides increasing the internal fraud effect by the ease of impersonate any user.
  • Like any other kind of trust between two parts based on some token, if one part (aka web layer) generates the SMSESSION token, the other part (aka application layer) must validate the token in order to guarantee the trustworthiness and integrity of the token. This is what ASA Identity Asserter does, plus building a trustful security context for JEE standard security development based on the container.

JEE Web Application Configuration

Starting from the point that you already have an up and running SiteMinder, ASA and WSA installed and configured correctly (this can be accomplished by reading the SM manuals), you must configure your JEE Application. The main points of this configuration are in the descriptors “web.xml” and “weblogic.xml”, as show below:

– Descriptor “web.xml”:

<!-- This is the default JAAS token based auth method -->
<login-config>
	<auth-method>CLIENT-CERT</auth-method>
</login-config>

<!-- Declare all the roles used by your application -->
<security-role>
	<role-name>LoggedUsers</role-name>
</security-role>

<!-- Declare your protected resources -->
<security-constraint>
	<web-resource-collection>
		<web-resource-name>Protected resources</web-resource-name>
		<url-pattern>protected/*</url-pattern>
		<http-method>GET</http-method>
		<http-method>POST</http-method>
	</web-resource-collection>
	<auth-constraint>
		<role-name>LoggedUsers</role-name>
	</auth-constraint>
</security-constraint>

– Descriptor “weblogic.xml”:

<!-- Mapping between app roles and server principals (in this case, any valid user) -->
<security-role-assignment>
	<role-name>LoggedUsers</role-name>
	<principal-name>users</principal-name>
</security-role-assignment>

In order to use ASA and WSA, you must define your protected resources into both “web.xml” security constraints AND you app’s Domain/Realm on SiteMinder. This duplicated configuration is necessary because the JEE security constraints enables ASA interception and SM’s domains/realms enables WSA interception.

Tips and Tricks

  1. Always develop standard JEE security using JAAS (homemade security is risk full);
  2. Never trust only in “SM_USER” header (internal fraud);
  3. Always trust in the container JAAS Security Principal – request.getUserPrincipal();
  4. Even using ASA with WSA, there may be some scenarios in which the authenticated user in JSESSIONID is different than the SSO user present in the SMSESSION cookie. This can be happen, for example, when a user switches applications in different logged states, without invalidating the java session in the original application, meaning switched users. One tip to resolve this issue is to make a Servlet Filter in the web application which intercepts all requests and do a check between the “SM_USER” request header (injected by WSA) and the Security Principal fulfilled in the security context. If the values are different, this filter should invalidate the session and send a redirect to the same requested URL. This will guarantee the synchronism between SMSESSION and Security Principal;
  5. Be careful about JSESSIONID implicit sharing or overriding: if you have 2 web applications running in the same WebLogic domain using de default JSESSIONID cookie name and path, these applications will implicitly share the authenticated Security Principal, so you could think that SiteMinder is working when it’s not. To avoid this behavior you can define different JSESSIONID cookie name and/or path in the “weblogic.xml” descriptor for each application;
  6. When developing your own unified login page, reuse the default login page provided by SiteMinder “login.fcc” by backend, making a “backend HTTP POST” and propagating the cookies returned on the response (don’t expose the “login.fcc” page directly); a more elegant solution is to use the SiteMinder Secure Proxy Server (SPS), which contains a set of WebServices that provides some login operations on top of SiteMinder, so your login page can authenticate against the “AuthAZService.login” operation and put the returned attributes as cookies in the HTTP response to the user;
  7. Be very careful about enabling the functionality to propagate original requests of type POST after the user logs in. If your project sponsor really wants this requirement, then implement some anti-CSRF (Cross-Site Request Forgerie) mechanism in your application. To explain better, imagine a case of a very important and transactional POST inside your site protected area, like “http://bank.example.com/withdraw?account=bob&amount=1000000&for=Fred”. If you enable the POST propagation after login, some malicious web site can add a link which submits some hidden form to your application transactional POST. In this case, the login page will be shown to the user, and after the user authenticate successfully, your login page could perform the malicious POST, making catastrophic side effects.

Good luck !!!

SiteMinder WebLogic Security Provider Mock

The company I work for is deploying a Single Sign-On solution between its major JEE applications using CA Site Minder. All these JEE applications uses the standard JEE authentication and authorization (JAAS), which is managed by the application server. The overall reference architecture is to install SiteMinder Application Server Agent (ASA) on WebLogic Server’s machine (it will make available some new SM Security Providers to configure into the WLS security realm) and install SiteMinder Web Server Agent (WSA) on Web Server’s machine (Oracle HTTP Server in our case).

With this SSO solution, the authentication flow we achieve is:

  1. User requests for a protected page;
  2. SiteMinder agents redirects to an single unified login page, propagating the context of the original request;
  3. User enter his credentials on the unified login page;
  4. The unified login page authenticates the user against SiteMinder directories and redirects to the original page;
  5. User sees the protected page (with his valid “UserPrincipal” in the security context).

During this development, one of the major issues we faced was setting up the developers machines to make them able to integrate with SiteMinder in their local environments, because SiteMinder solution requires a lot of settings to enable each developer’s local WLS to connect to it, such as a full functional SM installation for which each developer need connectivity and countless settings on SM’s administration console for each developer machine, in addition to many other issues, like for example, if developer’s IP changes, then more configuration is needed… if SM is offline, then developer’s WLS not even starts… both SM and developer must have connectivity to the unified login page, and the token cookie (SMSESSION) must be set on the same domain that the developer’s local application runs, and many other issues. It goes on to become impractical as we talk about large or distributed development teams.

To solve this problem, I made a “Site Minder WebLogic Security Provider Mock” solution, which consists in a set of standard Java binaries that emulates the SiteMinder Application Server Agent behavior plus SiteMinder Web Server Agent behavior. This solution permits that developers can simulate a real SiteMinder SSO behavior in their local environments without need to any external dependencies, not even the SiteMinder. Depending on the mock configuration, it is flexible to emulate only the ASA behavior, only the WSA behavior, or ASA plus WSA behavior.

This solution consists of the following components:

  • SM Identity Asserter Mock – it’s a custom WebLogic security provider which listens for a “dummy” SMSESSION cookie and simulates the SM Application Server Agent behavior;
  • SM Login Page Mock – it’s a simple login page which authenticates against the container and creates the “dummy” SMSESSION cookie
  • SM Web Agent Filter Mock – it’s a servlet filter which simulates the front SM Web Server Agent behavior;
  • Configuration File – it’s a properties file containing the mock parameters, which will be detailed later;
  • SM Example App 1 – it’s a simple web application with a protected page, just to test the SSO;
  • SM Example App 2  – it’s another web application identical to the above, just to test SSO between them.

Edit 02/06/2015 – New version available: 1.1

You can download the full SiteMinder WebLogic Security Provider Mock components here (click over zip file then “Raw” button).

Installing the SM Identity Asserter Mock

1 – Copy the mock agent lib “SMIdentityAsserterMock.jar” to the following folder:

<MIDDLEWARE_HOME>\wlserver_10.3\server\lib\mbeantypes

2 – Restart the WebLogic server.

3 – Copy the configuration file “SMSecurityProviderMock-config.properties” to some folder accessible to WebLogic. In this example we used the above:

/conf/SMSecurityProviderMock-config.properties

Configuration details:

Property

Description

cookieName Cookie name for the SSO; to SiteMinder it must be “SMSESSION”
cookieDomain Cookie domain for SMSESSION; to make tests on localhost, this value must be empty
cookiePath Cookie path for SMSESSION; must be set to “/” because the cookie must be sent to every application in SSO
cookieMaxAge Time to live for SMSESSION cookie at client side; use “-1” to indicate that the cookie will persist until browser shutdown
loginPageUrl The mock login page URL; assuming that you are using the default port and context path, it will be “http://localhost:7001/SMLoginPageMock”
tokenExpirationInSecs Time in seconds in which the mock agents will consider that SMSESSION token has expired
wsaEnabled Boolean flag to enable or disable the WSA Filter Mock, useful if you don’t want to change the applications “web.xml” between environments

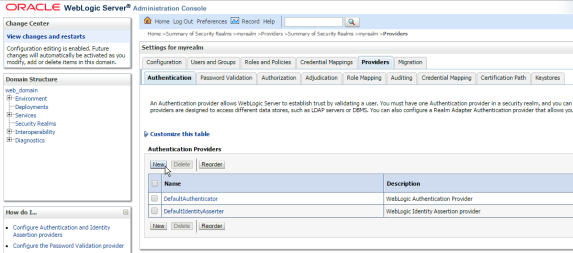
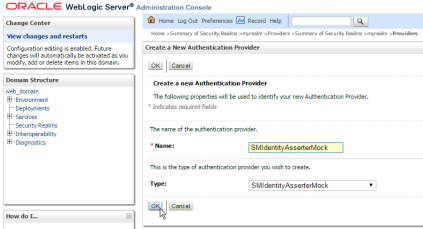
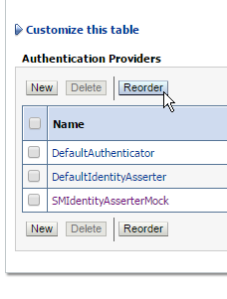
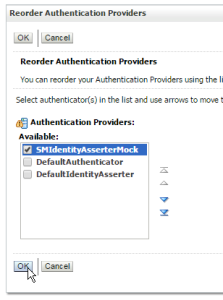
4 – Open the WLS administration console, and add a new security provider of type “SMIdentityAsserterMock”:

14_image1

14_image2

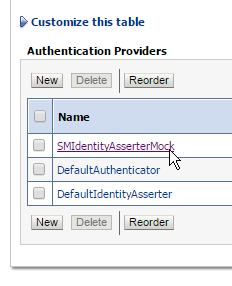
5 – Click on “Reorder” and make sure that the new provider will be the first of the list:

14_image3

14_image4

6 – Click on the “SMIdentityAsserterMock” provider on the list and go to tab “Provider Specific”. Configure the values according to following table:

Field

Description

Protected Domains List of application contexts that will participate in the SSO. The mock agent will ignore any other context even if SMSESSION cookie is present. It’s similar to the “Domain” concept of SiteMinder.
Config File Full path on filesystem where the “SMSecurityProviderMock-config.properties” file is present.

14_image5

14_image6

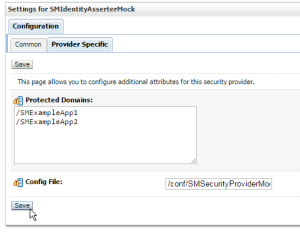
7 – Save your settings and restart WebLogic so changes can take effect:

14_image7

Installing SM Login Page Mock and Sample Apps

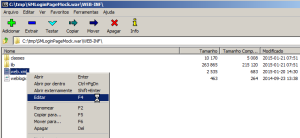
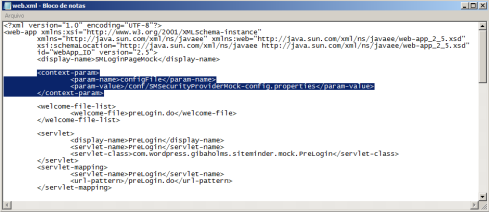
1 – Open the “SMLoginPageMock.war” compressed file with some zip editor and modify the contents of “web.xml”, changing the “configFile” context parameter to point to the full path of the config file on filesystem, like show below:

14_image8

14_image9

2 – Save changes and deploy “SMLoginPageMock.war” to the WebLogic Server (follow the default deploy process).

3 – Open the “SMExampleApp1.war” compressed file with some zip editor to see the contents of “web.xml”. You will notice that we have a servlet filter called “SMWebAgentFilterMock”. This is what you should do in your web application to enable the WSA mock behavior on top of the ASA. If you don’t use this filter, then your SSO will behave like you have only the ASA:

14_image10

14_image11

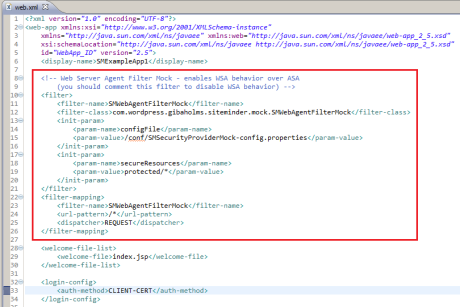
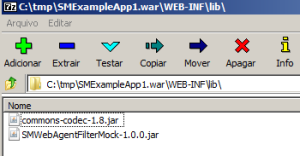
Obs.: to use this filter you have also to put the dependencies in your “WEB-INF/lib”, which are the “SMWebAgentFilterMock-1.0.0.jar” and “commons-codec-1.8.jar”.

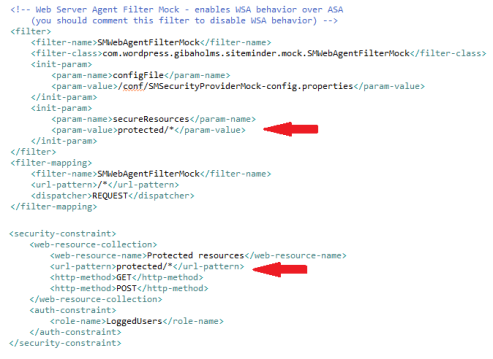
To the filter work properly, it also must be the “VERY FIRST” filter in you app filter chain, so it must be the first filter declaration in “web.xml” file. It also must be mapped to intercept all resources “/*”, and only “REQUEST” dispatch mode, to act precisely like a web server layer in front of all application requests.

You must also configure the “configFile” (the same as did previously) and “secureResources”. The secureResources must contain a list of comma-separated-values, containing all the url patterns for all protected resources inside the security constraints, it’s similar to the “Realm” concept on SiteMinder. Unfortunately the filter can’t read this values directly from the security constraints, so it must be declared again (like in a realm SiteMinder Realm configuration):

14_image12

4 – Save changes and deploy “SMExampleApp1.war” to the WebLogic Server (follow the default deploy process). Do the same thing for “SMExampleApp2.war”.

Testing the Single Sign-On

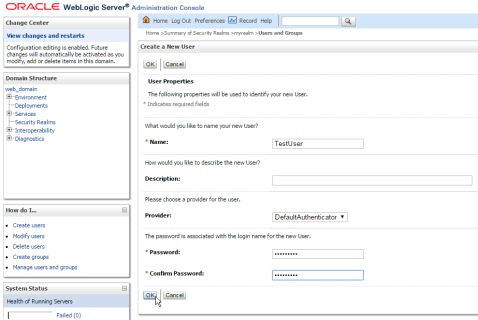
1 – Create some test user on WebLogic default security realm:

14_image13

2 – Open a browser and go to “SMExampleApp1” application:

14_image14

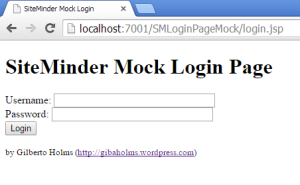
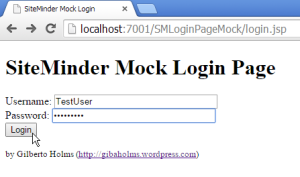
3 – Try to access the protected page. The first request to a protected resource without authenticated session will be intercepted by the authentication filter component inside the ASA mock, which will redirect to the login page:

14_image15

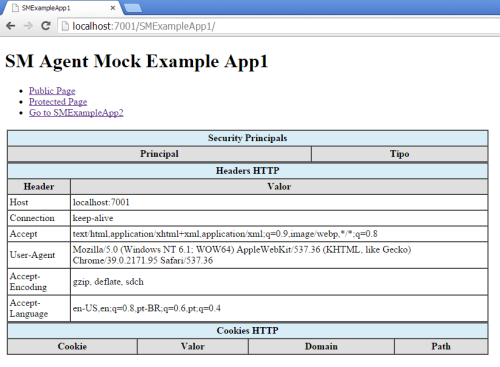
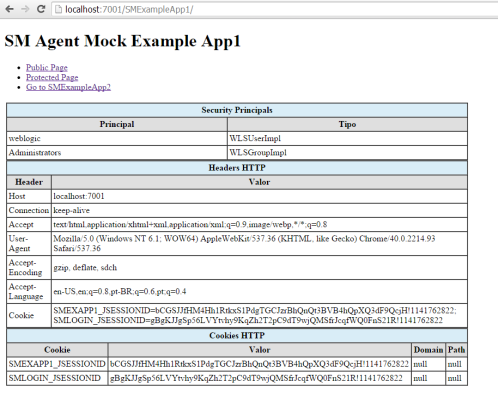
4 – Type the test user login and password, and submit the login. Now you must be redirected to the original protected page, with the security context filled with the UserPrincipal, like shown below:

14_image16

14_image17

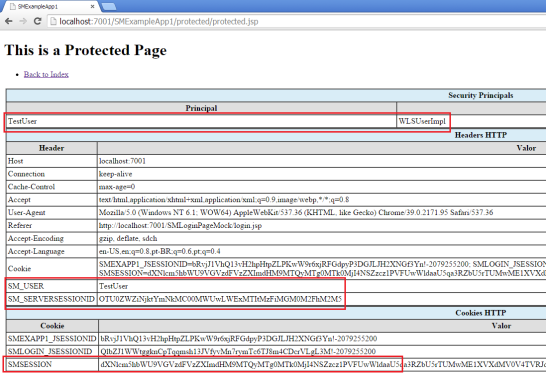
Some interesting things to note in the picture above:

  • Login page created SMSESSION “mock” cookie;
  • Identity asserter mock interpreted SMSESSION “mock” and recognized the user, making the WebLogic to fulfill the JAAS Security Principal;
  • Web agent filter mock recycled SMSESSION, extracted information from it and injected SM_USER and SM_SERVERSESSIONID into HTTP request headers to be available to the next layer (like a real WSA would have done).

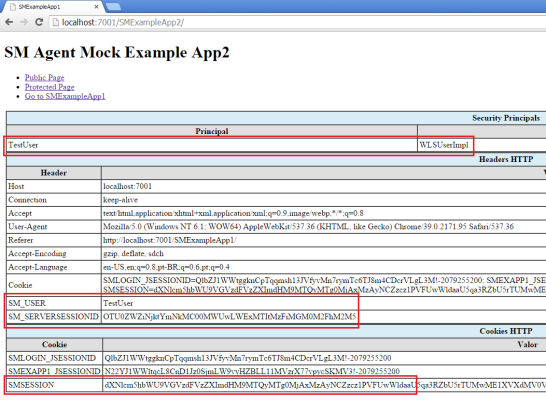
5 – Go back to index, the click on the link to go to “SMExampleApp2”. Notice that now the UserPrincipal is fulfilled in application 2 also (and the JSESSIONIDs are intentionally different for each application), so we accomplished the Single Sign-On as expected:

14_image18

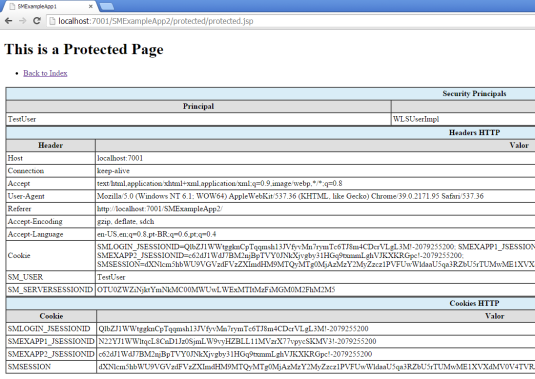
6 – Go to protected page on app 2, just to see the access granted:

14_image19

7 – As a last test you can force delete the SMSESSION cookie from your browser session or wait until its expiration, and the expected result is the login page being shown again for a protected resource access attempt.

Single Sign-Off

Your solution must provide a “Single Sign-Off” page also. This can be easily accomplished by some servlet which removes the SMSESSION cookie from the client. But remember that only doing this is may not be sufficient, because the user principal can remain stuck into the specific applications Web Session (JSESSIONID). So, each of the applications participating on the SSO must implement some logic into a filter which compares this two cookie states and then invalidates the session whenever necessary (e.g. check the presence of SMSESSION and compare the current user principal against the SM_USER header).

The login page mock provides a simple logout URL, which erases the SMSESSION and redirects to a custom origin URL:

http://localhost:7001/SMLoginPageMock/logout.do?urlOrigin=http://localhost:7001/SMExampleApp1

14_image20

Obs.: notice that SMSESSION is gone, but the user principal still stuck into Web Session JSESSIONID, so your application must prevent this situation and handle accordingly.

Overall SiteMinder Agents Single Sign-On Behavior

The purpose of this post was present the SiteMinder WebLogic agents mock solution designed by me to help developers to develop and integrate, but by experience we notice some exotic behavior on the SiteMinder agents in general. Perhaps in a next article I can drill down in the detailed behavior of each agent and present some tips to implement a SSO solution in SiteMinder which gracefully handles these various scenarios, when or not to use each agent ASA and/or WSA, but the table below provides a good overview of the ASA and WSA behavior when used isolated or together:

Web Application Context

SiteMinder Application Server Agent Behavior SiteMinder Web Server Agent Behavior
Accessed Resource JSESSION_ID SMSESSION Expected Behavior JAAS Security Principal

Web Agent

Public None or Not Authenticated None Grant acess No None
Public None or Not Authenticated Valid Grant acess Yes Recycle SMSESSION and add SM HTTP Headers (like SM_USER and SM_SERVERSESSIONID)
Public None or Not Authenticated Invalid or Expired Grant acess No Set SMSESSION = LOGGEDOFF
Public Authenticated None Grant acess Yes None
Public Authenticated Valid Grant acess Yes Recycle SMSESSION and add SM HTTP Headers (like SM_USER and SM_SERVERSESSIONID)
Public Authenticated Invalid or Expired Grant acess Yes Set SMSESSION = LOGGEDOFF
Protected None or Not Authenticated None Redirect to login page (by ASA) No Redirect to login page (by WSA). Obs.: using the SMWebAgentFilterMock, the first redirect will still be made by ASA and only the subsequent by the filter (due to JEE architecture restriction), but the result is the same.
Protected None or Not Authenticated Valid Grant acess Yes Recycle SMSESSION and add SM HTTP Headers (like SM_USER and SM_SERVERSESSIONID)
Protected None or Not Authenticated Invalid or Expired Deny access with HTTP 403 error No Set SMSESSION = LOGGEDOFF and redirect to login page (by WSA)
Protected Authenticated None Grant acess Yes Redirect to login page (by WSA)
Protected Authenticated Valid Grant acess Yes Recycle SMSESSION and add SM HTTP Headers (like SM_USER and SM_SERVERSESSIONID)
Protected Authenticated Invalid or Expired Grant acess Yes Set SMSESSION = LOGGEDOFF and redirect to login page (by WSA)

Export Audit Trail from Database SOA 10g and 11g

For a while I thought that was impossible to query the SOA composite instance audit trail directly from database. Several references on internet say that only SOA Management APIs can understand the format in which this information is stored into SOA Dehydration Store. Based on this, I posted about a java tool which does the audit export based on these APIs: https://gibaholms.wordpress.com/2013/07/18/soa-11g-audit-trail-exporter-tool/

The “SOA 11g Audit Trail Exporter Tool” still very useful due to simple features like the easy-of-use, remote export, no need database access to export (only a valid EM user) and file output. However, I finally found a way to query the audit trail XML directly from Database. The audit trail extraction is very fast and simple, and can be done by anyone with access to the SOAINFRA tables.

Edit 03-12-2015: New package version 1.1 available, with a bug fix to work properly on SOA 10g (thanks FRIEDRICH OBER-HONGSERMEIER for the contribution).

To perform this extraction directly from database, I wrote a simple PL-SQL function that does the Audit Trail tricks. I encapsulated it into a package called SOA_UTIL which can be compiled into a controlled area with some governance:


CREATE OR REPLACE PACKAGE SOA_UTIL AS
  
   -------------------------------------------------------------------------------------------
   -- Written by   : Gilberto Holms (https://gibaholms.wordpress.com/)
   -- Last update  : 07/11/2014
   -- Version      : 1.1
   -- Description  : Utility code to handle Oracle SOA Suite tables
   -- Release notes:
   -- 	1.0: Initial release
   --	1.1: Bug fix to work properly on SOA 10g
   -------------------------------------------------------------------------------------------
  
  FUNCTION GET_AUDIT_TRAIL(P_SCHEMA_NAME VARCHAR2, P_CIKEY NUMBER) RETURN CLOB;
  
END SOA_UTIL;

/

CREATE OR REPLACE PACKAGE BODY SOA_UTIL AS
  
   -------------------------------------------------------------------------------------------
   -- Written by   : Gilberto Holms (https://gibaholms.wordpress.com/)
   -- Last update  : 07/11/2014
   -- Version      : 1.1
   -- Description  : Utility code to handle Oracle SOA Suite tables
   -- Release notes:
   -- 	1.0: Initial release
   --	1.1: Bug fix to work properly on SOA 10g
   -------------------------------------------------------------------------------------------
  
  FUNCTION GET_AUDIT_TRAIL(P_SCHEMA_NAME VARCHAR2, P_CIKEY NUMBER) RETURN CLOB
  AS
    V_AUDIT_BLOB BLOB;
    V_AUDIT_CLOB CLOB;

	V_CUR_AUDIT SYS_REFCURSOR;

	TYPE TP_AUDIT_RECORD IS RECORD(
      BLOCK NUMBER(38,0),
      LOG BLOB
	);
    TYPE TP_AUDIT_ARRAY IS TABLE OF TP_AUDIT_RECORD;
    V_AUDIT_ARRAY TP_AUDIT_ARRAY;
    V_AUDIT_COMPLETE BLOB;

	V_BUFFER_LENGTH PLS_INTEGER := 32767;
    V_BUFFER VARCHAR2(32767);
    V_READ_START PLS_INTEGER := 1;
BEGIN

	DBMS_LOB.CREATETEMPORARY(V_AUDIT_BLOB, TRUE);
	DBMS_LOB.CREATETEMPORARY(V_AUDIT_CLOB, TRUE);
	DBMS_LOB.CREATETEMPORARY(V_AUDIT_COMPLETE, TRUE);
	
	OPEN V_CUR_AUDIT FOR 'SELECT BLOCK, LOG FROM ' || P_SCHEMA_NAME || '.AUDIT_TRAIL WHERE CIKEY = :cikey ORDER BY COUNT_ID' USING P_CIKEY;
	FETCH V_CUR_AUDIT BULK COLLECT INTO V_AUDIT_ARRAY;
	CLOSE V_CUR_AUDIT;

	FOR j IN 1..V_AUDIT_ARRAY.COUNT LOOP
		IF j = 1 THEN
			DBMS_LOB.APPEND (V_AUDIT_BLOB, V_AUDIT_ARRAY(j).LOG);
		ELSE
			IF ( V_AUDIT_ARRAY(j).BLOCK = V_AUDIT_ARRAY(j-1).BLOCK ) THEN
				DBMS_LOB.APPEND (V_AUDIT_BLOB, V_AUDIT_ARRAY(j).LOG);
			ELSE
				DBMS_LOB.APPEND (V_AUDIT_COMPLETE, UTL_COMPRESS.LZ_UNCOMPRESS(V_AUDIT_BLOB));
				DBMS_LOB.CREATETEMPORARY(V_AUDIT_BLOB, TRUE);
				DBMS_LOB.APPEND (V_AUDIT_BLOB, V_AUDIT_ARRAY(j).LOG);
			END IF;
		END IF;
	END LOOP;

	DBMS_LOB.APPEND (V_AUDIT_COMPLETE, UTL_COMPRESS.LZ_UNCOMPRESS(V_AUDIT_BLOB));
	V_AUDIT_ARRAY.DELETE;

	FOR i IN 1..CEIL(DBMS_LOB.GETLENGTH(V_AUDIT_COMPLETE) / V_BUFFER_LENGTH) LOOP
		V_BUFFER := UTL_RAW.CAST_TO_VARCHAR2(DBMS_LOB.SUBSTR(V_AUDIT_COMPLETE, V_BUFFER_LENGTH, V_READ_START));
		DBMS_LOB.WRITEAPPEND(V_AUDIT_CLOB, LENGTH(V_BUFFER), V_BUFFER);
		V_READ_START := V_READ_START + V_BUFFER_LENGTH;
	END LOOP;
	
	RETURN V_AUDIT_CLOB;
	
END;
  
END SOA_UTIL;

/

Then you can use this function inside a main query which filters the desired instances. This function works for both SOA 10g and 11g.

Usage example for Oracle SOA Suite 11g:


SELECT 
  CI.COMPOSITE_NAME AS COMPOSITE_NAME,
  CI.CMPST_ID AS INSTANCE_ID,
  CI.CREATION_DATE AS CREATION_DATE,
  CI.STATUS AS STEP,
  SOA_UTIL.GET_AUDIT_TRAIL('FMW11116_SOAINFRA', CI.CIKEY) AS AUDIT_TRAIL_XML
FROM
  SOAINFRA.CUBE_INSTANCE CI
WHERE 
  CI.COMPOSITE_NAME = 'MyComposite'
  AND CI.CREATION_DATE BETWEEN (sysdate - 1) AND (sysdate)
  ORDER BY CI.CREATION_DATE DESC;

Usage example for Oracle SOA Suite 10g:


SELECT 
  CI.PROCESS_ID AS PROCESS_ID,
  CI.CIKEY AS INSTANCE_ID,
  CI.CREATION_DATE AS CREATION_DATE,
  CI.STATUS AS STEP,
  SOA_UTIL.GET_AUDIT_TRAIL('ORABPEL', CI.CIKEY) AS AUDIT_TRAIL_XML
FROM
  ORABPEL.CUBE_INSTANCE CI
WHERE 
  CI.PROCESS_ID = 'MyBPEL'
  AND CI.CREATION_DATE BETWEEN (sysdate - 1) AND (sysdate)
  ORDER BY CI.CREATION_DATE DESC;

Event Details

Edit 03-12-2015: Added Event Details topic.

The audit trail is a large XML containing an array of events. The event XML usually contains all the message and details, like show below:


<event ...>
	<message>...</message>
	<details><![CDATA[ ... ]]></details>
</event>

However, for some very large XML payload, these event details are stored outside this structure, causing the event XML looks like this:


<event ...>
	<message>...</message>
	<details id="0" />
</event>

As you can see above, there is no payload inside the details tag, but there is a detail “id”.

So, if you are parsing the audit trail and you are interested on the details payload, every time you face this situation for some specific instance, you must make a separate call to a table named “AUDIT_DETAILS”, like shown below:


SELECT UTL_COMPRESS.LZ_UNCOMPRESS(BIN) AS AUDIT_DETAILS_XML 
FROM SOAINFRA.AUDIT_DETAILS 
WHERE CIKEY = '162524' -- put the cikey here 
AND DETAIL_ID = 0; -- put the details id here 

I used this technique in the company I work for, and by using the concepts shown in this article, I was able to do a full extract and parsing from SOA 10g and 11g databases getting all the information I needed to my use case. I hope you find it useful too.

OSB Throw Exception in XQuery

In this post I will show how to throw exceptions from an Oracle Service Bus 11g XQuery and then handle it into the pipeline flow. This technique is very useful to identify business exceptions into transformations and do business validations against the message payload.

The function that throws the exception is very simple, and can be called from any part of an XQuery code:

error(xs:QName('MyBusinessFault'), 'My message for the fault')

To handle the exception in the pipeline flow, you must add a “Service Error Handler” and then add a “Stage” with the following pattern:

OSB Flow Pattern to handle the exception thrown from XQuery

1. Checks if the exception handled was thrown from a XQuery error function:

$fault/ctx:errorCode = 'BEA-382513'

2. Identify the specific business exception by its name:

contains(fn-bea:serialize($fault/ctx:reason), 'MyBusinessFault')

3. Create a SOAP Fault Body and assign to the “body” variable. Here comes a little trick to extract the message from the exception, you must do exactly as shown:

<soap-env:Body>
  <soap-env:Fault>
	 <faultcode>Server</faultcode>
	 <faultstring>{substring-after($fault/ctx:reason/text(), 'MyBusinessFault: ')}</faultstring>
	 <detail/>
  </soap-env:Fault>
</soap-env:Body>

4. Reply with failure.

The use case presented here is only an example, but you can adapt the code to do whatever you want.

SOA 11g Audit Trail Exporter Tool

This project is a simple audit trail exporter tool, made for Oracle SOA Suite 11g (tested on version 11.1.1.6). It works for both BPEL and BPM based SOA composites.

Edit 03-13-2015: Text reviewed.

The SOA “Dehydration Store” stores all instance info and audit trail on some SOAINFRA tables (like AUDIT_TRAIL, AUDIT_DETAILS, XML_DOCUMENT and so on). If you have read privileges to these tables, you can do the export directly from database, as I show in this article: Export Audit Trail from Database SOA 10g and 11g

However, if you don’t have direct access to database or want a simple and controlled way to get the audit information for a specific set of instances, you can do the export using the tool presented here.

In a production environment, as the number of instances increases, the Enterprise Manager interface stuck many times, and can be very slow to access composite instance audit trail. Furthermore, is impossible to find a single instance based on some request payload info.

To get programmatic access to SOA audit information and do much more cool things, Oracle provides the Oracle SOA Suite Infrastructure Management Java API:

http://docs.oracle.com/cd/E28280_01/admin.1111/e10226/soaadmin_apimanage.htm

This project embeds this API, and provides a command-line interface to export instances audit trail, which can be filtered by a date range or the proper instance id. The result is the full audit trail, in form of human readable XML, for every single auditable component of the instances that matches the search filters. Then you can use system tools like “grep” to find a specific instance based on payload content, and see its full execution audit trail.

You can download the SOA Audit Exporter Tool on the link below:

SOAAuditTrailExporter.zip

Usage example:


Full Export:

  java -jar SOAAuditTrailExporter.jar -host=10.2.2.35 -port=8000 -username=weblogic -password=welcome01 -outBaseFolder=/temp/SOAAuditTrailExporter -compositePartition=default -compositeName=MySOAComposite -compositeRevision=1.0

Export By Date:

  java -jar SOAAuditTrailExporter.jar -host=10.2.2.35 -port=8000 -username=weblogic -password=welcome01 -outBaseFolder=/temp/SOAAuditTrailExporter -compositePartition=default -compositeName=MySOAComposite -compositeRevision=1.0 -minCreationDate=07/01/2013 -maxCreationDate=07/03/2013

Export By Instance ID:

  java -jar SOAAuditTrailExporter.jar -host=10.2.2.35 -port=8000 -username=weblogic -password=welcome01 -outBaseFolder=/temp/SOAAuditTrailExporter -compositePartition=default -compositeName=MySOAComposite -compositeRevision=1.0 -instanceId=20158

Enjoy!

Siebel Connection Pool in Oracle Service Bus 11g

When a middleware is used to make a lot of Web Service calls to Siebel CRM, the usual login mechanism is too slow and expensive. In the usual login, the Siebel application makes one login / logoff to every Siebel layer involved (application, database, etc) to every single call. When making a lot of concurrent calls, contention may occur in any of the underlying layers and some requests can be delayed or rejected, returning an error to the caller in some cases.

To ease this problem and improve performance, the most commonly solution is to use a Stateless Session Management of Authorization, which means that username and password are provided only in the first call, and subsequent calls are made using a SessionToken that is returned every time for the next call.

Obviously it would be amazing to do some kind of Connection Pool, or more specifically, a Token Pool/Cache to open some stateless sessions on demand, and reuse them using the next tokens.

I did a search in Google to find some references and cases of this approach, and I found some articles about using JAX-WS SOAP Handlers. But I was disappointed because I can’t use SOAP Handlers in my Middleware, and I can’t propagate this pool solution along all my applications making a Point-To-Point integration to Siebel.

The SOA architecture that we use here takes advantage of the Oracle Service Bus 11g to encapsulate all Siebel calls acting as a Proxy, doing input validation, security centralization and enforcement, endpoint management, policy attachment, statistics monitoring, parameterized data enrichment, service lifecycle management, and so on. Basically, all clients take access to Siebel through OSB:

In this article I will show a solution to make the Siebel Connection Pool using SessionToken at the OSB level, in a SOA approach. The best thing about this solution is the fact that none of the Siebel service clients are impacted by this change because the connection pool is centralized at the mediation layer, in this case, OSB, and no interfaces are changed.

The Connection Pool Classes

To control the pool, I made some simple Java classes, the first one is a simple DTO do pack the Siebel username and password into a single object to act as the key to store the tokens (implementing equals and hashcode default generated by Eclipse):

package com.wordpress.gibaholms;

public class SiebelCredential {

	private String username;
	private String password;

	public SiebelCredential(String username, String password) {
		this.username = username;
		this.password = password;
	}

	@Override
	public String toString() {
		return "SiebelCredential [username=" + username + ", password=" + password + "]";
	}

	@Override
	public int hashCode() {
		final int prime = 31;
		int result = 1;
		result = prime * result + ((password == null) ? 0 : password.hashCode());
		result = prime * result + ((username == null) ? 0 : username.hashCode());
		return result;
	}

	@Override
	public boolean equals(Object obj) {
		if (this == obj)
			return true;
		if (obj == null)
			return false;
		if (getClass() != obj.getClass())
			return false;
		SiebelCredential other = (SiebelCredential) obj;
		if (password == null) {
			if (other.password != null)
				return false;
		} else if (!password.equals(other.password))
			return false;
		if (username == null) {
			if (other.username != null)
				return false;
		} else if (!username.equals(other.username))
			return false;
		return true;
	}

	public String getUsername() {
		return username;
	}

	public String getPassword() {
		return password;
	}

}

I created another simple class to hold a Siebel token with his creation date. This date will be used to avoid returning certainly expired tokens:

package com.wordpress.gibaholms;

import java.util.Date;

public class SiebelToken {

	private String token;
	private Date creationDate;

	public SiebelToken(String token, Date creationDate) {
		this.token = token;
		this.creationDate = creationDate;
	}
	
	public SiebelToken(String token) {
		this(token, new Date());
	}
	
	@Override
	public String toString() {
		return "SiebelToken [token=" + token + ", creationDate=" + creationDate + "]";
	}

	public String getToken() {
		return token;
	}

	public Date getCreationDate() {
		return creationDate;
	}

}

The most important class to control the pool is very simple, just making a static cache of a Queue of tokens mapped by credential (username and password pair). I also added some counters to be retrieved by one statistics service if necessary. As you can see, the methods to get/add tokens are synchronized to support concurrent requests from OSB. Obviously some short locks may occur, but the performance loss is insignificant compared to the login/logoff Siebel problem, because the methods are very simple and cheap:

package com.wordpress.gibaholms;


import java.util.HashMap;
import java.util.LinkedList;
import java.util.Map;
import java.util.Queue;

public class TokenPool {
	
	private static final int SIEBEL_TOKEN_EXPIRATION_IN_MINUTES = 15;
	
	private static final Map<SiebelCredential, Queue<SiebelToken>> tokensByCredential;
	private static long addCount;
	private static long pollCount;
	private static long hitCount;
	private static long missCount;
	
	static {
		tokensByCredential = new HashMap<SiebelCredential, Queue<SiebelToken>>();
	}
	
	public synchronized static String pollToken(String username, String password) {
		pollCount++;
		SiebelCredential credential = new SiebelCredential(username, password);
		if (tokensByCredential.containsKey(credential)) {
			Queue<SiebelToken> tokens = tokensByCredential.get(credential);
			while (tokens.size() > 0) {
				SiebelToken token = tokens.poll();
				long diffInMinutes = (System.currentTimeMillis() - token.getCreationDate().getTime()) / (60 * 1000);
				if (diffInMinutes < SIEBEL_TOKEN_EXPIRATION_IN_MINUTES) {
					hitCount++;
					return token.getToken();
				}
			}
		}
		missCount++;
		return null;
	}
	
	public synchronized static void addToken(String username, String password, String token) {
		addCount++;
		SiebelCredential credential = new SiebelCredential(username, password);
		if (!tokensByCredential.containsKey(credential)) {
			tokensByCredential.put(credential, new LinkedList<SiebelToken>());
		}
		tokensByCredential.get(credential).add(new SiebelToken(token));
	}

	public static void eraseCounters() {
		addCount = 0;
		pollCount = 0;
		hitCount = 0;
		missCount = 0;
	}
	
	public static long getAddCount() {
		return addCount;
	}

	public static long getPollCount() {
		return pollCount;
	}

	public static long getHitCount() {
		return hitCount;
	}

	public static long getMissCount() {
		return missCount;
	}
	
}

Notice also that we have a constant SIEBEL_TOKEN_EXPIRATION_IN_MINUTES to give us a hint to indicate if the token would be expired on Siebel. The token expiration time on Siebel is a system parameter named SessionTokenTimeout that can be adjusted according to your needs. The default value indicated in Siebel documentation is 15 minutes. More information can be found on the official docs here: http://docs.oracle.com/cd/B40099_02/books/EAI2/EAI2_WebServices32.html#wp178856

Using this simple date control we avoid having old tokens into pool and minimize the chances of waste Siebel calls to discover that the token is expired to try again with full header unnecessarily, improving the pool efficiency. However some expired tokens may still pass because sometimes may occur a milliseconds window between the token creation date on Siebel and the token creation date into our pool, so the expired token error still need to be handled.

Now just assemble these classes into a JAR file and we are ready to define the best Message Flow to get/put tokens into this cache in the appropriate moments.

The Service Bus Project

Our OSB project looks like this:

  • SiebelSWEBusiness.biz
    Is a generic business service for all Siebel Web Services. All SWE services use the same endpoint and are only differed by WSDL, so we can use a single BS of type “Any SOAP Service – SOAP 1.1”.

  • siebel-connection-pool-1.0.jar
    Is a simple JAR file containing the classes shown above in this article. We will use the “Java Callout” activity to get/add tokens from the pool using the static methods of the following class: “com.wordpress.gibaholms.TokenPool”.
  • SiebelAccount.sa
    Is a Service Account of type “Static” that holds the Siebel username and password. The OSB clients authenticate themselves through the Weblogic security realm using WS-Security, which centralizes the access policies to corporative resources.

  • AssignSiebelHeaderFull.xq
    Is a reusable XQuery which mounts the full Siebel header, with username and password:

  • AssignSiebelHeaderToken.xq
    Is a reusable XQuery which mounts the Siebel header with SessionToken tag only:

  • SiebelStatelessSession.proxy
    Is the main Proxy Service which contains all the logic to handle the requests and manage the Siebel tokens. It would be a bad idea to replicate all this logic along all Siebel Proxy Services, so I decided to encapsulate this logic into a single PS of type “Any SOAP Service” and protocol “local”. Then any Siebel service can use the connection pool, just routing the flow to this PS:

    The message flow shown above is the secret for the solution. To understand more deeply I suggest download the code and inspect the boxes, but I will try to explain the flow in a more high level:

    Stage

    Description

    AssignSiebelAccount Get the username and password from the SiebelAccount.sa for use later when mounting the headers
    GetTokenFromPool Try to get a token from the pool and assign to a variable. If the pool is empty, the variable will be null
    AssignSiebelHeader If exists token, the token is used in the header, otherwise, the full header is mounted
    BackupRequestBody This stage saves the original request body into a variable for the case of getting token expired error on the first attempt, because, in this case, it will be used for a second attempt
    DefineErrorType According to the return of the first attempt, we need to take some actions. The OSB Error Handler is a very bad place to put complex logic because of the product architecture, then the route handler only detects the type of error occurred and let the flow resume to the response pipeline, which takes the correct actions.
    HandleSiebelReturn In this place the flow detects four possibilities:

    TokenExpired: makes a second attempt using the full header, with username and password

    ErrorWithToken: put the response token into the pool and return the error

    ErrorWithoutToken: just return the error

    Success: put the response token into the pool and return the response

    For security reasons, the response header is removed from the message in all cases.

    HandleSecondAttemptError The flow will fall into this block only if the second attempt results in error too, so it just verify if the error response have a token, which is added into the pool, otherwise, the error is returned to the caller.
  • MySiebelService.wsdl
    This WSDL represents our Siebel regular SWE Web Service, generated by Siebel Tools. No secrets here.
  • MySiebelService.proxy
    This Proxy Service represents the access point to our Siebel service, which will be called by end consumers. Note that is very simple to reuse the “SiebelStatelessSession.proxy” by just creating an ordinary Proxy Service from Siebel service WSDL and adding a route, replying the original fault:

Supported Scenarios

  • Success on the first call – OK;
  • Generic application error on the first call, without returning token – OK;
  • Generic application error on the first call, returning token – OK;
  • Token expired error in the first call, and success on the retry call – OK;
  • Token expired error in the first call, and generic application error on the retry call, without retuning token – OK;
  • Token expired error in the first call, and generic application error on the retry call, retuning token – OK.

Benefits of the Solution

  • No changes to the service interfaces;
  • No changes to the service consumers;
  • No code replication;
  • No infrastructure logic leak to the service consumers;
  • Centralized solution;
  • Easy to manage and maintain;
  • Pluggable solution, easy to enable/disable to any service;
  • Incredible performance gain to the entire corporation, because all Siebel services can be pool enabled as fast as add a route in OSB.

Now we can easy enable the Connection Pool to any Siebel SWE service into the SOA mediation layer, with no impacts on actual service consumers and “zero” code replication, in a corporative way.

Attachments

(Updated 08/02/2012 – 08:47)

Source Code:
https://github.com/gibaholms/articles/tree/master/Siebel_Connection_Pool_in_OSB

FFPOJO and Spring Batch Integration

This week I had a need to integrate FFPOJO (version 1.0) and Spring Batch (version 2.1.8.RELEASE). I know that Spring Batch have its own LineTokenizers and FieldSetMappers, but is much more clean, flexible and fast using FFPOJO to do this parsing job. The integration was very easy, just by creating a simple LineMapper extension.

The FFPojoLineMapper class:

import org.springframework.batch.item.file.LineMapper;

import com.github.ffpojo.FFPojoHelper;

public class FFPojoLineMapper<T> implements LineMapper<T> {

	private Class<T> recordClazz;

	public T mapLine(String line, int lineNumber) throws Exception {
		return FFPojoHelper.getInstance().createFromText(recordClazz, line);
	}

	public void setRecordClazz(Class<T> recordClazz) {
		this.recordClazz = recordClazz;
	}

}

That’s it!

To use this glue, let’s sample with the POJO record class shown below:

@PositionalRecord
public class Customer {

	private Long id;
	private String name;
	private String email;
	
	@PositionalField(initialPosition = 1, finalPosition = 5)
	public Long getId() {
		return id;
	}
	public void setId(Long id) {
		this.id = id;
	}
	// must use a String setter or a FieldDecorator
	public void setId(String id) {
		this.id = Long.valueOf(id);
	}
	
	@PositionalField(initialPosition = 6, finalPosition = 25)
	public String getName() {
		return name;
	}
	public void setName(String name) {
		this.name = name;
	}
	
	@PositionalField(initialPosition = 26, finalPosition = 55)
	public String getEmail() {
		return email;
	}
	public void setEmail(String email) {
		this.email = email;
	}
}

Then the reader declaration in the job context xml will look like this:

<batch:job id="sampleJob">
	<batch:step id="sampleFFPojoReadingStep">
		<batch:tasklet>
			<batch:chunk commit-interval="100">
				<batch:reader>
					<bean class="org.springframework.batch.item.file.FlatFileItemReader">
						<property name="lineMapper">
							<bean class="sample.reader.FFPojoLineMapper">
								<property name="recordClazz">
									<value type="java.lang.Class">sample.Customer</value>
								</property>
							</bean>
						</property>
					</bean>
				</batch:reader>
				<batch:writer>
					<bean class="sample.writer.MyItemWriter" />
				</batch:writer>
			</batch:chunk>
		</batch:tasklet>
	</batch:step>
</batch:job>

Soon this code will be available in an integration module embedded into FFPOJO project binaries, and more samples will be added.

The FFPOJO framework can be found in the Maven Central:

<dependencies>
	<dependency>
		<groupId>com.github.ffpojo</groupId>
		<artifactId>ffpojo</artifactId>
		<version>1.0</version>
	</dependency>
</dependencies> 

If you want to know better the FFPOJO library, please visit the project website on GitHub.

Central Maven Repository Publish Experience

This week I published an Open Source Project that I maintain, to the Sonatype OSS Repository Hosting Service, with the objective of make the project available in the Central Maven Repository.

The project that I published is the FFPOJO Project, which is a Flat-File Parser, POJO based, library for Java applications.

The objective of this post is to comment my experience in the publishing process and provide some tips and points to people who are in this process to.

  • It’s quite obvious but you must own the domain in your GroupId and the package names must start with this domain too;
  • If you host your project at GitHub, you can create a free account and turn it on an organizational account, then link this account to your personal user as an organization member. This can provide you an domain like “https://github.com/projectname&#8221;, which let you to use the group id and package names like “com.github.projectname”;
  • Create a parent-pom and use inheritance and multi-modules to concentrate project-specific pom tags into the parent-pom and facilitate the release process. Remember that the nested project structure is more compatible than flat structure;
  • Follow strictly the instructions in the official Sonatype repository usage guide;
  • Use the javadoc pluging and the source plugin to generate the “-javadoc.jar” and “-sources.jar”;
  • Use the maven release plugin to facilitate the release management;
  • If you use GitHub and Windows for development, you might get an error on release:prepare that maven stucks after the push command. This happens when you use passphrase in your GitHub SSH certificate. The best solution I found is to use other certificate with no passphrase. I found other solutions like use putty pageant/plink to cache the certificate and passphrase and use it as ssh client, but not worked for me. The easiest is not use passphrase at all;
  • If you use GitHub and Windows for development, when you call release:prepare on Cygwin Git Bash, you might see an error like “pom.xml is outside repository”. It’s a relative/absolute path trouble in the maven git scm plugin. The best solution I found is to run maven from cmd.exe instead of Git Bash. Then the ssh.exe and git.exe folders must be in the PATH variable;
  • Don’t forget to publish your GPG public key at the public keyservers (hkp://pool.sks-keyservers.net, hkp://keyserver.ubuntu.com, hkp://pgp.mit.edu). This is verified by the central at release promotion time.

That’s it. I have not found any other trouble in the process, it is very fast and the JIRA administrators are very attentive. Finally, the FFPOJO framework can be found in the Maven Central like any other open source framework:

<dependencies>
	<dependency>
		<groupId>com.github.ffpojo</groupId>
		<artifactId>ffpojo</artifactId>
		<version>1.0</version>
	</dependency>
</dependencies> 

If you want to know better the FFPOJO library, please visit the project website on GitHub.